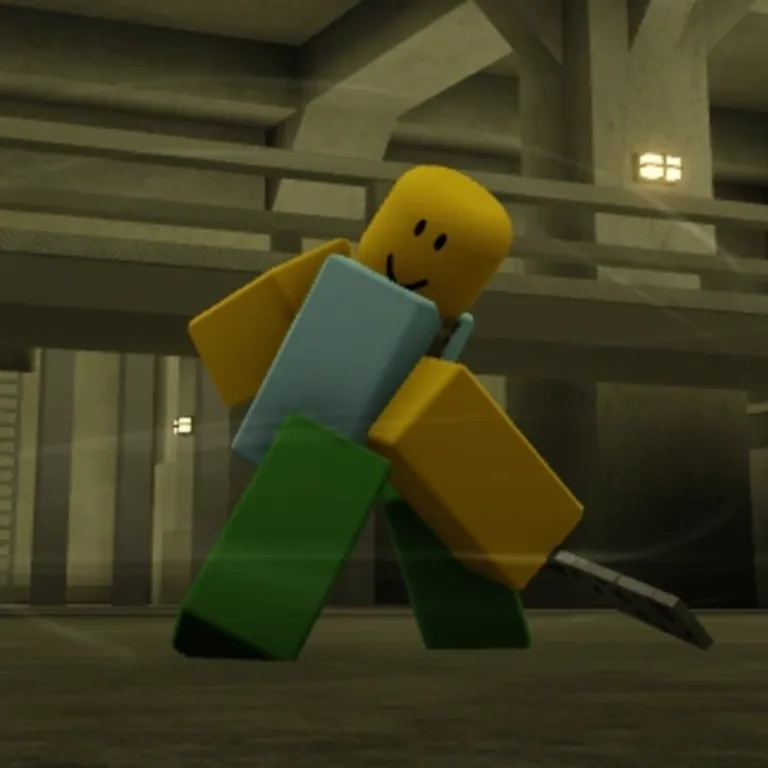
Salaryman
Health
100
Special (R)
Ratio Point
Cooldown 5s, none on Ratio interruption
Awakening (G)
Overtime
Versions
V1.69
finished V1.73
Base moveset
- Blunt CleaverCOSMETIC
Cosmetic: a cleaver wrapped in white cloth with black dots and a yellow dotted tie; held in front when blocking and holstered when holding an item or emoting.
EffectGrants a cursed tool and clothing cosmetics - Ratio Black FlashPASSIVE
Landing the final neutral M1 or an uppercut on a Ratio-marked enemy adds a precise Black Flash that doubles damage and knockback.
EffectUppercuts and final neutral M1s on a Ratioed target will deal double damage and knockbackBlockableInterruptibleCan't hit ragdolled targetsMelee - Ratio PointSPECIAL
Aim at a target within 70 studs and press again when the circle crosses the 7:3 line to mark a weak point for 4.5 seconds. Marked targets take extra damage.
Cooldown5s, none on Ratio interruptionUnblockableUninterruptibleHits ragdolled targets - Cleaving WhirlwindMove 1
Charge 25 studs forward while spinning with melee i-frames, ending with a downward slash that knocks the opponent away.
Damage12Cooldown16sBlockableInterruptibleCan't hit ragdolled targetsMelee - Cleaving WhirlwindSPECIAL VARIANT
On a Ratio-marked target the swing deals more damage and, if it interrupts anyone, staggers their right arm to lower their block angle for 7 seconds.
Damage16Cooldown16sUnblockableInterruptibleCan't hit ragdolled targetsMelee - Severance KickMove 2
Kick forward; on contact, cursed energy pushes the target away with evadable stun or ragdoll, even through block. The kick can also arm and hurl throwables.
Damage12 for kick, 15 from throwablesCooldown14sSemi-blockableInterruptibleCan't hit ragdolled targetsMelee - Reverse KickDIRECTION: BACKWARD VARIANT · Severance Kick
Walking backward before using the move makes you kick behind you with the left leg, pushing enemies away with unevadable stun. Slightly longer windup.
Damage12 for kick, 15 from throwablesCooldown14sUnblockableInterruptibleCan't hit ragdolled targetsMelee - Reverse KickVARIANT
Using Reverse Kick to interrupt any opponent action except blocking stuns the target in place.
Damage12 for kick, 15 from throwablesCooldown14sUnblockableInterruptibleCan't hit ragdolled targetsNo EvasiveMelee - Blunt CutMove 3
Brief windup, then a flash-step 34 studs forward and a swing. Holding adds 15 studs and damage with a longer windup; after Severance Kick it skips the windup.
Damage9, 14 if heldCooldown16sBlockableInterruptibleHits ragdolled targetsMelee - Blunt CutSPECIAL VARIANT
On a Ratio-marked target it deals more damage and, if it interrupts (block included), staggers their left leg to disable their dashes for 7 seconds.
Damage13, 18 if heldCooldown16sUnblockableInterruptibleHits ragdolled targetsMelee - Cross CutAIR VARIANT · Blunt Cut
Used while airborne, you dive down with melee i-frames; on hit, an unblockable swing follows that disables the enemy's ragdoll cancel.
Damage9, 5 for dive, 4 for sliceCooldown16sSemi-blockableInterruptibleHits ragdolled targetsNo EvasiveMelee - Cross CutAIR SPECIAL VARIANT
On a Ratio-marked target the dive deals more damage and, if it interrupts (block included), staggers their left leg to disable their dashes for 7 seconds.
Damage15, 11 for dive, 4 for sliceCooldown16sUnblockableInterruptibleHits ragdolled targetsNo EvasiveMelee - Cross CutAIR SPECIAL VARIANT
If the enemy is marked after the dive lands, the slash is empowered instead: more damage, an upward ragdoll that keeps ragdoll cancel, and a right-arm stagger on interruption.
Damage15, 5 for dive, 10 for sliceCooldown16sUnblockableInterruptibleHits ragdolled targetsMelee - StabilizeMove 4
Thrust the cleaver into the stomach and twirl it; on hit, both players are stunned briefly, but you can leave the stun with Cleaving Whirlwind or Blunt Cut.
Damage6Cooldown12sBlockableInterruptibleHits ragdolled targetsMelee - StabilizeINTERRUPTION/SPECIAL VARIANT
Interrupting an enemy or hitting a Ratio-marked one makes them cough blood, stunning both long enough to land Cleaving Whirlwind or Blunt Cut. Extra damage only on interruption.
Damage6, 10 on interruptionCooldown12sUnblockableInterruptibleCan't hit ragdolled targetsMelee
Overtime · Awakening
- OvertimeAWAKENING
Awakening: your "Overtime" binding vow raises your cursed energy output to 110-120%, and you switch the cleaver to your left hand. Heals 25 HP and lasts 60 seconds.
Healing25 HPDuration60sUninterruptible - OvertimeAWAKENING VARIANT
After a Stabilize stagger, awakening becomes a rush and Black Flash punch. A miss loses 60% of awakening progress; a hit awakens you and sets Ratio Breaker to stage 2.
Damage12, 16 with RatioHealing25 HPDuration60sAwakening refund40% if missedUnblockableUninterruptible - Wall of StoneCOSMETIC
Cosmetic block animation: you lower your guard and take hits like a stone wall, without using the cleaver to defend.
EffectGrants a custom block animation - Working OvertimePASSIVE
M1 set damage rises to 18 (4 + 4 + 5 + 5) and every M1 can destroy the environment.
EffectIncreases M1 set damage to 18 (4 + 4 + 5 + 5) and allows each M1 to destroy the environmentBlockableInterruptibleCan't hit ragdolled targets - Ratio Black FlashPASSIVE
Same as base, except the final M1 is stronger overall and becomes unblockable.
EffectDoubles the knockback and damage of all ratioed 4th M1 variants and makes them unblockableUnblockableInterruptibleCan't hit ragdolled targetsMelee - Ratio PointSPECIAL
The technique loses its cooldown and is no longer restricted to a single target.
UnblockableUninterruptibleHits ragdolled targets - Ratio Breaker ISTAGE 1/4
Stage 1 of 4. Each stage must hit a Ratio-marked target to advance. A downward cleaver slash wakes ragdolled players, then a right hook lands a Black Flash.
Damage10, 5 per hit (10 to either with Ratio, up to 20)Cooldown19s, none with RatioUnblockableInterruptibleSemi-ragdollNo EvasiveMelee - Ratio Breaker IISTAGE 2/4
Stage 2 of 4: a straight punch that triggers a Black Flash and gives melee i-frames. Interrupting a marked target staggers their right arm for 12 seconds.
Damage7, 14 with RatioCooldown19s, none with RatioUnblockableMelee i-framesCan't hit ragdolled targetsMelee - Ratio Breaker IIISTAGE 3/4
Stage 3 of 4: a long hop into a heavy slam that crushes everyone nearby with black sparks.
Damage10, 20 with RatioCooldown19s, none with RatioUnblockableInterruptibleHits ragdolled targetsExplosion - Ratio Breaker IVSTAGE 4/4
Stage 4 of 4: melee i-frames, a 60-stud dash and a cutscene swipe. The Black Flash hits one target and cannot kill; the follow-up can kill and scatters nearby enemies.
Damage35 for black flash (105 with Ratio) / 10 for follow up (40 for nearby enemies)Cooldown19sUnblockableMelee i-framesHits ragdolled targetsExplosion - SharpenMove 2
Slide 45 studs dragging the cleaver to heat it, then slice upward to launch enemies; Ratio-marked targets lose their dashes for 7 seconds.
Damage15, 23 with RatioCooldown20sUnblockableMelee i-framesHits ragdolled targetsExplosion - ErosionAIR VARIANT · Sharpen
If airborne, you hover a second then slam overhead, grounding enemies; marked targets lose side dashes for 7 seconds. It can cancel the leap of Ratio Breaker III or Collapse.
Damage15Cooldown20s, 8s if feinted by M1/blockUnblockableInterruptibleHits ragdolled targets - ErosionAIR VARIANT
While preparing the slam, a Ratio bar appears; aligning it with the 7:3 line widens the impact area and bounces targets upward. It does not affect Ratio Point.
Damage15Cooldown20sUnblockableInterruptibleHits ragdolled targetsExplosion - InterrogateMove 3
Holster the tool, grab a target by the neck and cut them off with a gut punch that cannot kill. A marked target's left leg staggers for 7 seconds.
Damage4 for grab, 10 for punchCooldown20sUnblockableMelee i-framesHits ragdolled targetsMelee - InterrogateMove 3
After the punch you chase the target; if you reach them, you lift them again and hit them in the face. A marked target's right arm staggers for 7 seconds.
Damage4 for grab, 16 for punchCooldown20sBlockableProjectile i-framesHits ragdolled targetsMelee - CollapseMove 4
Leap into the air with a heavy slam that marks the environment and leaves debris suspended; on marked targets the second impact hits harder with unevadable ragdoll.
Damage5 for slam, 7 for impact (15 with Ratio)Cooldown22sUnblockableMelee i-framesHits ragdolled targetsExplosion - CollapseUSE AGAIN VARIANT
Pressing again, even while stunned, drops the debris on everything below; damage scales with the debris count. It falls on its own after 8 seconds.
Damage+9 per debris, caps at 40Cooldown22sUnblockableUninterruptibleHits ragdolled targetsNo EvasiveExplosion
Finishers
Finishers are the kill animations a move plays when it lands the last hit; the numbers are the wiki's.
- Ratio Black FlashPASSIVE
Finisher: the Black Flash's knockback makes the target look weightless as they fly away.
Semi-blockableInterruptibleCan't hit ragdolled targetsMelee - Cleaving WhirlwindSPECIAL VARIANT
Finisher: the Ratio-enhanced slash cuts off the target's right arm; if you interrupt them, both arms are torn off.
DamageInsta-killCooldown16sUnblockableInterruptibleCan't hit ragdolled targetsMelee - Severance KickMove 2
Finisher: the target crumbles under the kick and is flung away; Reverse Kick has the same finisher.
DamageInsta-killCooldown14sInterruptibleCan't hit ragdolled targetsMelee - Blunt CutSPECIAL VARIANT
Finisher: you mark the target's torso as a weak spot and bisect them in a cutscene, then an extra impact separates the two halves.
Damage1 for impactCooldown16sUnblockableInterruptibleHits ragdolled targetsMelee - Cross CutAIR SPECIAL VARIANT · Blunt Cut
Finisher: synchronized with your technique, the slash cleanly beheads the enemy.
DamageInsta-killCooldown16sUnblockableInterruptibleHits ragdolled targetsMelee - Ratio Breaker IVSTAGE 4/4
Finisher: on the final stage, the target's body is overwhelmed and severed into pieces.
DamageInsta-killCooldown22sUnblockableMelee i-framesCan't hit ragdolled targetsExplosion - SharpenMove 2
Finisher: the upward slice leaves the target's legs behind while the upper body flies.
DamageInsta-killCooldown22sUnblockableInterruptibleHits ragdolled targetsExplosion - ErosionAIR VARIANT · Sharpen
Finisher: the enhanced slash crushes the target into flying pieces; it also applies if the circle misses the 7:3 line.
DamageInsta-killCooldown22sUnblockableInterruptibleHits ragdolled targetsExplosion - InterrogateMove 3
Finisher: the punch adds more force and cursed energy and sends the target flying; it bypasses Lucky Coward's Miracles.
DamageInsta-killCooldown20sUnblockableInterruptibleHits ragdolled targetsMelee - CollapseUSE AGAIN VARIANT
Finisher: the target cannot withstand the weight of the debris and collapses into pieces and red mist.
DamageInsta-killCooldown22sUnblockableInterruptibleHits ragdolled targetsExplosion
Pros and cons
Pros
- The base moveset has slightly low cooldowns and short, strong combos.
- A ratio stagger gives an edge in M1 trades: on the leg it limits the enemy's aggression, on the arm it makes passive play harder.
- Reverse Kick and Stabilize work as decent neutral tools, and delaying the back kick in combos for an M1 reset is safe and rewarding against a target with no counter.
- You can combo into the awakening, which gives easy access to a one-shot move.
Cons
- Ratio Point is not purely timing-based, and its visible and audible cues let targets avoid contact until it ends.
- Staggering only works on an enemy that can act, who can then also dash away or counter.
- There are punish windows, such as after Blunt Cut or Cross Cut.
- Ratio Breaker's final stage is hard to reach, and the opponent may already be dead before then.
- Interrogate's first-hit knockback makes the follow-up dash impossible to land without a wall.
About Salaryman
Kento Nanami, the overworked grade 1 sorcerer of Jujutsu Kaisen, is the model for Salaryman. It is a full character (base moveset plus the Overtime awakening), free for every player, added in V1.69 with the standard 100 HP.
Everything hangs on Ratio Point, a special with a 5 second cooldown and a 70 stud reach. Press again when the circle crosses the 7:3 line and the target stays marked for 4.5 seconds. A mark upgrades most of the kit: Cleaving Whirlwind rises from 12 to 16 damage, Blunt Cut from 9 to 13, and the last neutral M1 adds a Black Flash that doubles damage and knockback. The base cooldowns are on the low side (Stabilize 12 seconds, Severance Kick 14, the other two 16), and the wiki lists slightly low cooldowns and short, strong combos among its strengths.
Overtime heals 25 HP, lasts 60 seconds, raises the M1 string to 18 damage and unlocks Ratio Breaker, four stages on a 19 second cooldown. Its last stage hits for 35, or 105 on a marked target. The wiki lists the weak points plainly: Ratio Point gives off visible and audible cues, so careful opponents can avoid contact until it ends, and Blunt Cut and Cross Cut leave punish windows.
Where it sits in our tier list
More full characters
Jujutsu Shenanigans guides
Frequently asked questions
How do you unlock Salaryman in Jujutsu Shenanigans?
Free: any player can pick it from the character list.
What is Salaryman's awakening?
Overtime. Awakening swaps the four moves for Ratio Breaker I, Ratio Breaker II, Ratio Breaker III, Ratio Breaker IV, Sharpen, Interrogate, Interrogate, Collapse; the awakening itself lists healing 25 HP, duration 60s.
How much health does Salaryman have?
The wiki lists 100 HP. Most characters have 100; lower health usually comes with stronger tools.
Data taken from the Jujutsu Shenanigans Wiki (CC BY-SA), organized with AI assistance; nothing here is tested in the game; wiki read on 2026-10-24.